Building My Cybersecurity Home Lab
Introduction
In the fast-paced world of cybersecurity, having a safe and controlled environment for testing tools and techniques is essential. For my first project, I built a fully functional cybersecurity HomeLab using VMware Workstation Pro 17. This HomeLab allowed me to simulate real-world scenarios, practice both red and blue team skills, and prepare for future professional work without risking my main system or any live network.
Objective
- Create an isolated virtual network for cybersecurity testing.
- Install multiple virtual machines (VMs) to simulate different
systems and environments.
- Configure networking to allow both internet access and private lab
communications.
- Lay the foundation for advanced cybersecurity projects such as
IDS/IPS deployment, malware analysis, and threat detection.
Tools and Resources
I used a range of tools and virtual machines to build my HomeLab.
This variety ensured I could replicate real-world cybersecurity
environments.
• VMware Workstation Pro 17 – Hypervisor for running multiple VMs.
• Kali Linux – Penetration testing and red team operations.
• Parrot OS – Alternative pentesting and security analysis platform.
• Metasploitable 2 – Vulnerable target machine for exploitation
practice.
• Ubuntu Desktop – General Linux environment for testing.
• Ubuntu Server – Server-side testing and hosting of security tools.
• Windows 10 – Client-side OS for phishing and malware simulation.
• Windows 8 – Legacy OS for vulnerability testing.
• Windows Server 2022 – Enterprise server simulation.
• Security Onion – Network security monitoring and intrusion
detection.
• Splunk – Log management and SIEM capabilities.
Networking Setup
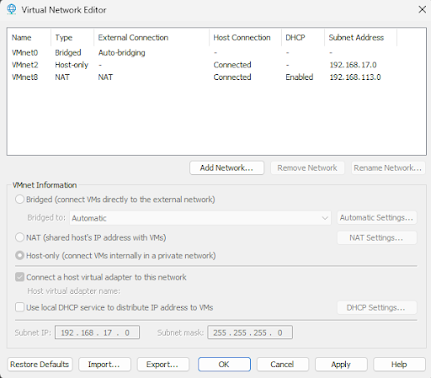
I created two main networks inside VMware:
1. Private Lab Network (Host-Only / VMnet2) – Isolated from the
internet, used for attack/defense simulations.
2. Internet-Connected Network (NAT / VMnet8) – Gives safe VMs
controlled internet access for updates and tool downloads.
Each VM was configured with two adapters:
* Adapter 1 → VMnet2 (Isolated traffic)
* Adapter 2 → VMnet8 (Internet access)
This dual-adapter approach ensured maximum flexibility while
maintaining strict security boundaries.
Step-by-step
Step 1 – Installing VMware Workstation Pro
I installed VMware Workstation Pro 17 on my host machine and enabled
virtualization in my BIOS to ensure optimal performance when running
multiple VMs simultaneously.
Step 2 – Creating the Virtual Network
Using the Virtual Network Editor, I configured
VMnet2 as Host-only for isolated communication between VMs, and
confirmed VMnet8 (NAT) for internet access. This setup ensured my
lab had both isolated and internet-connected environments.
Step 3 – Installing Virtual Machines
Each VM was installed with two network adapters:
1. Adapter 1 → Host-only (VMnet2) for lab traffic.
2. Adapter 2 → NAT (VMnet8) for internet access.
This dual-adapter approach provided flexibilitywhile maintaining
security.
Step 4 – Setting Up Security Tools
I installed Security Onion for network intrusion detection and
Splunk for log management. Ubuntu Server acted as a central host for
some security tools. Windows Server 2022 was configured for
enterprise-like scenarios.
Step 5 – Testing Network Connectivity
I verified communication between machines on VMnet2 using the ping
command, ensured internet access through VMnet8, and confirmed
vulnerable machines like Metasploitable 2 remained isolated from the
internet.
Challenges Faced
- Resource Management: Running multiple VMs required careful CPU/RAM
allocation.
- DHCP Issues: Some VMs didn’t receive IP addresses until DHCP was
enabled for VMnet2.
- Security Precautions: Vulnerable systems were strictly isolated to
prevent accidental exposure.
Outcome
The HomeLab now operates as my personal cybersecurity testbed. I can simulate attacks, deploy defenses, analyze logs, and safely conduct malware research.
Conclusion
This HomeLab is my foundation for hands-on cybersecurity learning. With diverse systems and advanced security tools, I can build, test, and refine both offensive and defensive skills.